There are many different types of systems used in hydroponic gardening. However, all of them evolve around the ability to control the basic requirements of a plant, which are nutrient, water and oxygen supplies. The success of hydroponics comes about when there is a continuous cycle of watering, draining and aerating created to feed the plant and allow it to thrive. There basically two types of hydroponic systems. These include passive and active. The passive system includes Flood and Drain (or Ebb and Flow), Deep Water Culture (DWC), Drip feeding, Wick feeding, Nutrient Film Technique (NFT), and Aeroponics. This article touches on the construction of a DIY drip feeding system.
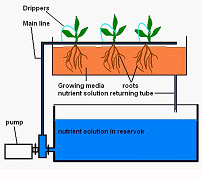
Drip systems are common in European hydroponics cultivation. Each plant is fed individually through feeding tubes which are connected to a pump hooked onto a timer that activates at pre-set times. Drip systems reduce the possibility of bacteria or fungal infection. Most home DIY drip systems are low-pressure systems that recycle the nutrient solution. Drip systems are used mainly to grow herbs, tomatoes, or peppers. Figure 1 shows each plant being fitted with an emitter or drip which allows for adjustments to the amount of solution per plant. The drip may also be fitted over the top of each row of plant, and then the solution is channeled back into the reservoir which is then pumped back into the main line for reuse.

Figure 1 Basic outline of how a drip system works
Tools and Materials
- A reservoir for nutrient solutions to collect
- A second reservoir (with a drainage tube that will allow nutrient solution to drip back to the first reservoir)
- A pump
- Growing medium
- 100% silicone sealer (small tube)
- Hydroponics grow and bloom nutrients solutions
- Main line to run from pump to rows of plants with tube attachments
- Tubing to drip solution on plants
- Styrofoam
- Drill a hole at the bottom of the top reservoir that will hold the growing media and the plants. This hole will allow the nutrient solution pumped into the drippers to flow back into the bottom reservoir.
- Attach a returning tube to this hole drilled and seal the edges with silicone sealer so that it does not drip everywhere else except down into the bottom reservoir.
- Install the pumps and main line to the bottom reservoir. Then attach the dripper tubes that will individually feed each plant.
- The set up of the top planters is similar to the wick feed system (minus the wick in the individual planters).
- Cut the StyroFoam (to act as a floater) according to the width and length of your top reservoir about 1/4″ (inch) smaller. This floater should fit with enough room to adjust to water level changes.
- Trace the net pots on the StyroFoam and cut the trace with a knife or box cutter.
Note: Space the net pots on the floater so that each plant receives sufficient amounts of light (do not overcrowd).
- Place each planter with growing media (either rockwool or grow rocks) and pop them onto the Styrofoam floater.
- Make sure that you paint the nutrient solution reservoirs black with spray paint as this will prevent algae from growing inside. Scratch a vertical line with a utility knife on top of the black spray paint on the top reservoir so that you can determine the level of nutrient solution used by your planters.
Planting
You can start the seeds in small peat pots or any soil-less seed starting cubes or plugs. The small plants can then be transplanted into the growing medium. If you are growing tomatoes or peppers, make sure that you insert a three foot plastic pole into each pot on each side of the plant for support.
The whole system can be placed under a covered patio or indoors as long as grow lights are used.
Maintenance
- When you start a drip hydroponic system, start with a full reservoir of nutrient solution.
- To top up when the solution in down, add a gallon of pH adjusted water and allow the system to run for about 5 minutes.
- Then drain the system. Fill the reservoir back again to the full level with a new batch of pH adjusted nutrient solution.
- Make sure that you use grow solution. When the plants begin to flower, switch to a bloom solution to encourage better bloom.
- Make sure that you clean the pump and drippers every three months or so (sooner if needed). Clean the pump as well.
- After completing a growing season, rinse the reservoir containing the growing medium and air dry.
Once you\’ve started building and maintaining your hydroponics system, you will find out just how rewarding an experience it is when you can enjoy the fruit (or vegetables) of your labor. An indoor hydroponic system definitely sets to be a conversation piece in the home.
More Reading:
Gardening Without Soil – Hydroponic Vegetable Growing:
http://ezinearticles.com/?Gardening-Without-Soil—Hydroponic-Vegetable-Growing&id=2406340
A Guide to Hydroponics: http://besthydroponicssite.com/
DIY Hydroponic: http://www.diy-hydroponics.com/media.html
Drip systems:
http://www.hydroponicsearch.com/Explore_the_Science_of_Hydroponics/Hydroponics_cultivation_methods/Drip_systems/

